Soldando con estaño los cables de los motores

A continuación voy a contar cómo arreglar algo que sucede con demasiada frecuencia con el minidron CX10 de la marca Cheerson. Como sabéis, este pequeño cuadricóptero lo podéis encontrar por unos 15€ en diversas tiendas, tanto desde China, Europa o incluso desde España (amazon)

Ya he tenido 2 de éstos, y he comprado algunos más para amigos y familiares, ya sean el CX10, el CX10A (con headless) y el CX10C (con cámara, pero nunca llegó). El CX10W (con cámara y wifi a través del móvil, lo cual permite «fpv») parece interesante, y algún día lo tendré que probar.

Y bien, ¿qué problema presentan estos drones? pues la extrema debilidad de los diminutos cables de los motores. Sí, se rompen con demasiada frecuencia, y dejan de funcionar.

He arreglado ya 3 drones: uno mío (CX10), que se le rompió un motor y tuve que reemplazarlo (http://www.banggood.com/Cheerson-CX10-RC-Quadcopter-Spare-Parts-Motor-CX10005-p-930092.html), otro de un alumno y otro de un amigo.

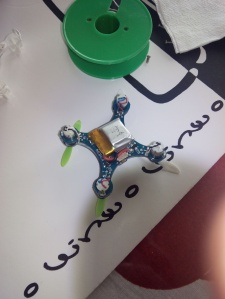
Fijaos, en la siguiente foto se ve el dron boca abajo y abierto: tenemos 4 motores, cada uno con 2 cables, 4 leds en las puntas de los brazos, una batería de 100mAh en el centro y una controladora de vuelo con giróscopo de 3 ejes (X-Y-Z) y acelerómetro también de 3 ejes.
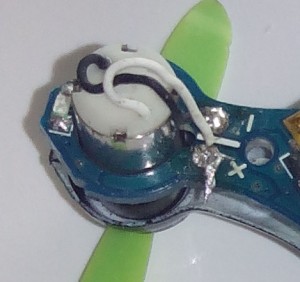
IMG_20160411_162453_1024

IMG_20160411_162453_detalle_soldadura_cable1Si nos acercamos a la imagen, podemos ver cómo me ha quedado esta soldadura de estaño, bastante mal, por cierto: de hecho, luego no cierra, la tuve que arreglar. Hay que  hacer tener un poquito más de habilidad y buen pulso, además de un soldador decente.
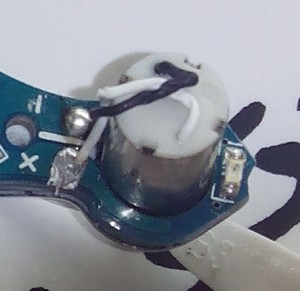
IMG_20160411_162453_detalle_soldadura_cable2Ésta otra ya me quedó un poquito mejor.

Hay que tener cuidado con el tamaño de la gota de estaño: aunque parezca una tontería, una gota demasiado gorda puede hacer que el dron se desestabilice con más facilidad. ¿Cómo se suelda esto tan pequeño? pues lo que yo he hecho, que no será lo más óptimo pero funciona, es colocar la punta del soldador sobre la gotita de estaño que ya viene para que se derrita y, con una pequeña pinza, colocar el extremo del cable justo encima; luego retirar el soldador con cuidado para que el estaño se seque.

Podéis contactar conmigo a través de mi twitter @juanpesoft
How to install a rear view camera on a Alfa 159

Publicado: 9 de enero de 2014 en Coches

Hello everybody,

since I was a child i´ve been always thinking about «how things work» and «what is inside the tv». So nowadays i have some projects in my mind related to fligth objects (build rc planes, multicopters rc, fpv (first person fligth)), car (front, rear and side view cameras and distance sensor by ultrasounds…), home security (pir sensors, ir cameras,…). Moreover, i´ve seriously thought about building a laser game to achieve that 2 rc planes could make an aerial battle.

As you can read, I have plenty of things inside my mind which are responsible in having a restless mind (it is said that i´m a freak guy, although i don´t  think so 😉 ). But due to lack of time, almost all things are projects. I wish i had more free time in order to build all things which are around my mind. This is the reason why i´m going to explain you my best ever «invention» i´ve have ever done: mounting a rear view camera on my own car by myself.

All you need is a car (this one for example), a waterproof rear view wireless 12v camera (this one for example), a monitor (this one for example) and a lot of patient and been a bit handyman.

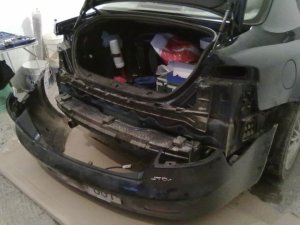
I started searching & downloading the car workshop book (not the user manual the car includes), where i could appreciate how to dismount the rear car bumper. All new cars have 8 screws at the same places, so it´s very easy to find them. You will need a sheet of cardboard in the floor in order to avoid any damage in the painting.

As a result, you can appreciate the details in the next picture:

167033_155685594481870_8231239_n

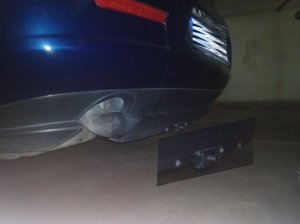
In my case, I needed a dremel too for cutting the lower part of the bumper to install the camera there. Furthermore, you have to be sure how to drive the wires (power and video signal) through the bumper to the inside of the trunk. So the best option is use the same hole that the rear license plate light uses.

Secondly, once the wires are in the trunk, you need to plug the power line to the rear view light; then the camera will turn on when the reverse gear is engaged.

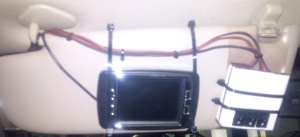
Next, you need to through the video wire signal from the trunk to the place you have install the monitor before; in my case, the monitor is inside the left sunvisor. This is the reason why when i need to use the camera i have to put the sunvisor down. Here you can see a picture about how i´ve mounted it.

sunvisor

Finally, i have to say that trying out the rear view car camera for parking i have to admit that i would have preferred a better quality image camera and, overall, a larger angle camera (maybe 170º instead of 135º).

rear camera 1

As soon as a can, i have the idea of adding another camera, but in this case in the front of the car. For example, this model will be suitable for. In adition, i´ll need a pair of  infrared lamps in order to drive at nights with lights turned off.

That´s all and I hope you have enjoy my experience and i invite you to ask me any doubt, question or suggestion you have. I promise to finish this post when i had more free time.

The more and more i´m getting older the more and more busy i have my mind.

Encuesta inicial

Publicado: 14 de abril de 2012 en Encuestas

Hello world!

Publicado: 13 de abril de 2012 en Sin categoría

Welcome to WordPress.com. After you read this, you should delete and write your own post, with a new title above. Or hit Add New on the left (of the admin dashboard) to start a fresh post.

Here are some suggestions for your first post.

  1. You can find new ideas for what to blog about by reading the Daily Post.
  2. Add PressThis to your browser. It creates a new blog post for you about any interesting  page you read on the web.
  3. Make some changes to this page, and then hit preview on the right. You can always preview any post or edit it before you share it to the world.